
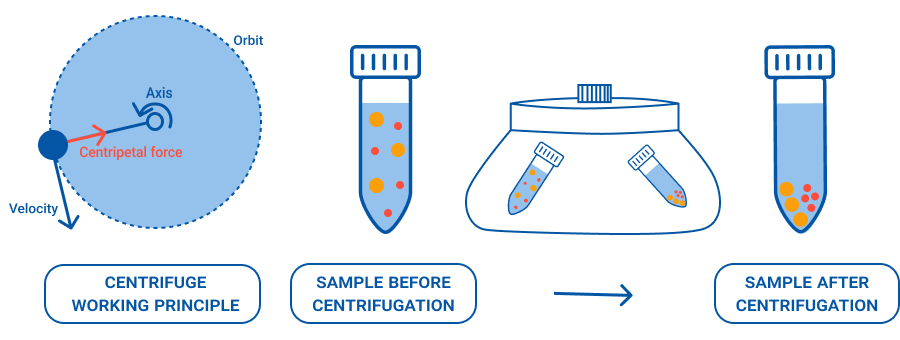
Centrifuges do one job extremely well: they use rapid spinning to separate a mixture into parts you can actually work with. In minutes, the heavier components collect as a compact pellet, while the lighter liquid remains as the supernatant (and in some cases, distinct layers form). The underlying principle is straightforward: a centrifuge applies a force many times greater than gravity to push particles outward, so that components separate based on their size, density and shape far faster than they ever would on a bench.
In this guide, you will get:
-
a practical, science-based answer to “how does a centrifuge work?”;
-
what the key settings mean;
-
how to choose centrifuge for consistent and repeatable results;
-
where common mistakes can quietly undermine your separations.
How Does a Centrifuge Work? The Core Concept
A centrifuge separates a mixture by spinning it fast enough to generate a very high g-force. Under this acceleration, particles travel through the liquid at different speeds depending on their size, density, and shape, as well as the viscosity of the surrounding medium[1]. The denser or larger components move outward more quickly and collect as a compact pellet, while the lighter liquid remains as the supernatant. With the right setup, you can also separate a sample into clear, distinct layers – a technique used routinely in blood fractionation and density gradient work[2].
Sedimentation happens naturally under gravity (leave a blood sample standing overnight and the cells will eventually settle), but a centrifuge generating 1,500 × g compresses that overnight wait into roughly ten minutes. At the higher end, ultracentrifuges can reach forces above 100,000 × g, enabling researchers to separate particles as small as individual proteins and nucleic acids[3].
What controls separation?
Four main factors determine the outcome of any centrifugation run:
-
Force at the sample (RCF / × g) – the centrifugal force actually experienced by the particles, which depends on both spin speed and rotor radius
-
Time – how long the force is applied; longer runs allow smaller or less dense particles to separate
-
Temperature – critical for heat-sensitive biological samples; friction between rotor and air generates heat at high speeds
-
Rotor geometry – tube angle and radius determine the sedimentation path length and where the pellet forms[4]
Change any one of these, and you change how fast particles move and where they collect in the tube.
RPM vs RCF: how to match settings across centrifuges
Many protocols list speed in RPM (revolutions per minute), but RCF (relative centrifugal force, expressed in × g) is usually the better value to follow. Here is why: the force your sample actually experiences depends not only on how fast the rotor spins, but also on the rotor’s radius. As a result, the same RPM can produce very different g-forces in different centrifuges (and that difference can change how well your sample separates).
Eppendorf illustrates this clearly in their centrifugation basics guide[1]: two centrifuges spinning a 1.5 mL tube rotor at the same 14,000 RPM can produce 13,100 × g on one machine and 20,817 × g on another, simply because the rotor radii differ. That is a 60% difference in force at identical RPM settings. The mathematical relationship is straightforward – RCF increases with the square of the RPM, so doubling the speed quadruples the force.

A practical tip: when you move a method from one centrifuge to another, aim to match the RCF first, then fine-tune spin time if needed. Many modern centrifuges allow you to enter RCF directly and will calculate the correct RPM for the installed rotor. Always report centrifugation conditions in your notebooks and SOPs as RCF (× g), not just RPM, as this is the single easiest step you can take to ensure your protocols are reproducible across instruments.
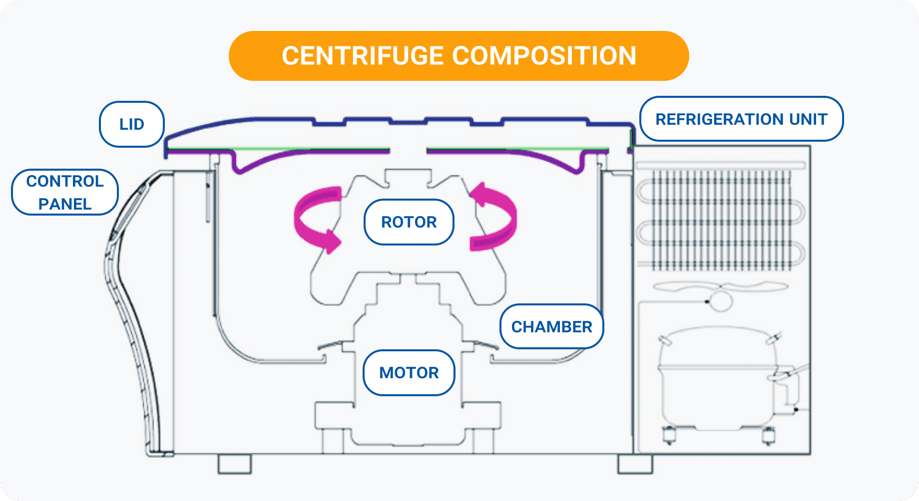
The key parts of a centrifuge (and why they matter)
Knowing the main components of a centrifuge helps you work safer and get more consistent results. Each part plays a role in either the force applied to your sample or the stability of the run.
-
Motor and controller: Set the speed and manage acceleration and deceleration profiles, which affect how smoothly your sample separates. Electrical braking (reversing current to the motor) is standard on most modern centrifuges
-
Rotor: Holds the tubes and determines the radius and angle – two factors that directly influence the g-force at the sample and where the pellet forms
-
Buckets and adapters: Keep tubes properly seated and balanced so the load spins evenly and safely. Incorrect adapters or mismatched tubes are a common source of imbalance problems[5]
-
Lid lock and imbalance sensors: Keep the lid closed during a run and help detect dangerous imbalance. The CDC’s centrifuge safety training emphasizes that safety interlocks should never be bypassed[6]
-
Temperature system (refrigerated models): Maintains a set temperature to protect heat-sensitive samples. Rotor friction generates significant heat during high-speed runs, potentially denaturing proteins or affecting enzyme activity
Rotor choice: fixed-angle vs swinging-bucket
The rotor is not just a holder for your tubes – it directly shapes your results. Because centrifuges (from a compact microcentrifuge to a full-size benchtop unit) can have different rotor sizes and designs, the same sample can behave differently depending on the rotor you choose[7].
Fixed-angle rotors hold tubes at a set angle (typically 25–45°). They are ideal for fast, routine pelleting because particles take a shorter path to the tube wall and quickly form a compact pellet on the outer side of the tube near the bottom. Because fixed-angle rotors have no moving parts, they experience less mechanical stress and can achieve higher g-forces than swinging-bucket rotors (which translates to shorter run times for many applications).
Swinging-bucket rotors allow tubes to swing out to a horizontal (90°) position during the run. This makes separation happen along the full length of the tube, producing cleaner, more horizontal layers. The trade-off is that the moving buckets experience greater metal stress, limiting maximum g-force and sometimes requiring longer run times.

A practical tip: pellet position differs between the two rotor types. In a fixed-angle rotor, the pellet smears along the side of the tube toward the bottom; in a swinging-bucket rotor, it collects neatly at the very bottom center. If you are working with low-concentration samples and need to resuspend the pellet in a very small volume of buffer, the centered pellet from a swinging-bucket rotor can be an advantage[4].
How does a centrifuge work in practice? A step-by-step guide
A great centrifuge run is not about “spinning faster.” It is about setting up the run correctly so your sample separates cleanly, safely, and the same way every time. The following checklist draws on manufacturer guidance and laboratory safety best practices[8] to help you avoid the small mistakes that lead to poor separation, remixed pellets, or damaged equipment.
-
Pick the right tube. Confirm chemical compatibility with your sample and check the tube’s maximum RCF rating. Exceeding it can cause tube failure mid-run
-
Inspect the rotor and accessories. Check for cracks, corrosion, or residue. Rotor failure from metal fatigue or chemical corrosion is one of the most serious centrifuge hazards
-
Balance by mass, not volume. Match opposing centrifuge tubes within your lab’s tolerance and the manufacturer’s guidance. This is especially important at high speeds: two tubes with equal volume but different sample densities can create a dangerous imbalance
-
Load symmetrically. Mirror tube positions across the rotor. Use a balance tube filled with water (or a liquid of similar density to your sample) if you have an odd number of tubes
-
Set RCF, time and temperature. Choose RCF instead of RPM when possible. Set temperature before starting if using a refrigerated centrifuge – pre-cooling the rotor prevents heat shock to your first run
-
Start and listen. If you notice vibration or unusual noise, stop the run immediately and rebalance. Stanford EHS recommends turning off the centrifuge and not using it again until it has been inspected if unusual vibration persists
-
Wait for a complete stop. Never bypass safety locks or open the lid early. The rotor continues spinning by inertia even after power is cut
-
Remove tubes gently. Keep them upright to avoid remixing separated layers. If working with biohazardous samples, open sealed rotors or safety cups inside a biosafety cabinet
How Is a Centrifuge Used in Everyday Lab Work?
In the lab, a centrifuge is used to separate mixtures so you can collect either the pellet or the supernatant. Here are the most common applications:

1) Separating Cells into a Pellet
One of the most common uses is to collect cells from a liquid – wash them, count them, change media or start an experiment. You spin the sample at moderate force (typically 200–500 × g for mammalian cells) so the cells form a firm pellet, then carefully remove the supernatant without losing cells. Gentle braking is important because abrupt deceleration can resuspend a loosely packed pellet back into the liquid.
2) Clearing Cell Extract and Removing Debris
After cells are lysed (broken open), the mixture contains useful dissolved materials (such as proteins or DNA/RNA) plus solid fragments. Centrifugation is used to remove the solid debris into a pellet so you can keep a clean supernatant for the next step. If the supernatant is still cloudy, it often means the RCF or time was insufficient.
A practical note: increasing time slightly is usually safer than drastically increasing force, because too much force can pull down soluble material you actually want to keep in the liquid.
3) Blood Fractionation (Serum/Plasma)
Centrifuges are routinely used to separate blood into layers – serum or plasma above, cellular components – below. In particle separation guides[2] blood cells are separated from plasma at around 1,500 × g in approximately ten minutes. For more refined separations (such as isolating lymphocytes), density gradient media with a specific gravity of around 1.077 g/mL can be used so that lymphocytes float at the interface while denser cells pellet. Correct tubes and validated, standardized settings matter here because small handling mistakes after the run can disturb the layer boundaries, leading to cross-contamination between fractions.
4) Density Gradients
For more advanced separations, labs use centrifugation with density gradients to separate particles that are close in size or density – for example, different organelles, viruses or specific cell fractions. The goal is to create sharp, clear bands that you can collect separately. Longer spins, stable temperature and gentle deceleration matter because they keep the bands from smearing. Swinging-bucket rotors are strongly preferred for gradient work because the horizontal tube position during spinning produces even, well-defined layers that are easier to harvest.
Ready for More Consistent Centrifugation?
At its core, centrifugation is a controlled way to apply high g-force so the denser components of your sample move outward and collect as a pellet, while the liquid above remains the supernatant. When you set the right RCF, choose a rotor and tubes that fit your application, balance the load by mass and handle samples carefully after the run, you get cleaner separations and results you can reproduce with confidence.
.png?width=206&height=350&name=Eppendorf%20MiniSpin%20Plus%205453%20Centrifuge%20(Certified%20Refurbished).png) |
 |
 |
 |
At Pipette.com, we help you build that reliability into your workflow. Explore our selection of centrifuges, rotors, and accessories to find the setup that matches your protocols – so you can spend less time troubleshooting and more time getting consistent data.
You might be also interested in:
 |
 |
 |
| 8 Types of Laboratory Centrifuges & The Purposes They Serve | How to Choose the Right Pipette for Your Lab Application | What is a Vortex Mixer? A Lab-Ready Guide for Beginners |
Frequently Asked Questions (FAQ)
What is the difference between RPM and RCF, and which should I use?
RPM (revolutions per minute) measures how fast the rotor is spinning; RCF (relative centrifugal force, expressed in × g) measures the actual force applied to your sample. RCF depends on both RPM and the rotor’s radius, so the same RPM on two different centrifuges can produce very different forces. Always use RCF when setting up and reporting protocols – it ensures your results are reproducible regardless of which centrifuge is used.
Why should I balance tubes by mass rather than volume?
Samples can differ in density. Two tubes with identical volume but different sample compositions (for example, a sucrose solution versus water) will have different masses and create imbalance during spinning. Balancing by mass accounts for these density differences and protects both the rotor and the centrifuge from vibration damage.
When should I use a fixed-angle rotor versus a swinging-bucket rotor?
Use a fixed-angle rotor for routine pelleting applications (cell harvesting, lysate clearing, nucleic acid precipitation) where speed matters and you want a compact pellet. Use a swinging-bucket rotor when you need clean, horizontal layer separation (especially for density gradients) or when you want the pellet centered at the tube bottom for easier resuspension.
My supernatant is still cloudy after centrifugation. What should I try first?
A cloudy supernatant usually means the force or time was not sufficient to pellet all debris. Try increasing the spin time first (for example, add 5–10 minutes at the same RCF). This is generally safer than dramatically increasing force, which may pull down soluble proteins or other material you want to keep in solution.
Is it safe to open the centrifuge lid before the rotor has fully stopped?
No. Even after power is cut, the rotor continues spinning by inertia and carries enormous kinetic energy. Never bypass safety interlocks or attempt to slow the rotor manually. Wait for a complete stop before opening the lid – this is a fundamental centrifuge safety rule emphasized by both the CDC and equipment manufacturers.
How does temperature affect my centrifugation results?
Friction between the rotor and air generates heat, especially during long or high-speed runs. This can warm samples enough to denature proteins, degrade RNA or alter enzyme activity. For heat-sensitive biological work, use a refrigerated centrifuge and pre-cool the rotor before loading your samples. Check and set the temperature as part of your run setup – it is just as important as RCF and time.
List of References
- Eppendorf – Basics in Centrifugation: Centrifugal Force and Centrifuge Type
- Beckman Coulter – Principles of Centrifugation: Particle Separation
- Beckman Coulter – Relative Centrifugal Field (RCF)
- Eppendorf – When to Use a Fixed-Angle Rotor or a Swing-Bucket Rotor?
- CDC Division of Laboratory Systems – Fundamentals of Centrifuge Safety
- Beckman Coulter – Rotor Types
- Lab Manager – The Basics of Centrifuge Operation and Maintenance: A Laboratory Guide
- Stanford Environmental Health & Safety – Centrifuge Safety


